Installation Instructions
This video shows the full installation steps:
Alternatively you can follow these steps:
- Visit the WordPress.com Add-on for Google Docs page
- Click the blue button on the Google Add-ons page to install:

- A new Google document will open and you will be asked to confirm the add-on
- Click the “Add-ons” menu, then “WordPress.com for Google Docs”, then “Open”

Adding a site
Once the add-on is installed and opened you can add a site:
- Click the “Authorize” button to add a WordPress.com or Jetpack-powered WordPress.org site

- Select your site from the dropdown selector and click authorize

You can add as many sites as you wish. If you have a WordPress.org site and wish to use it via the add-on then you will need to install Jetpack.
Common Jetpack Problems
If you are using Jetpack then you may run into problems authorizing your connection. If a solution isn’t listed below then please contact Jetpack Support.
Enabling Jetpack JSON-API on WordPress.org
When using the Google Add-on with a WordPress.org site via Jetpack you need to enable the Jetpack JSON-API feature. This allows the add-on to communicate with your site securely.
To enable the JSON-API:
- Open the Jetpack menu in your WordPress admin dashboard and select Settings
- Search for json api and click to activate.
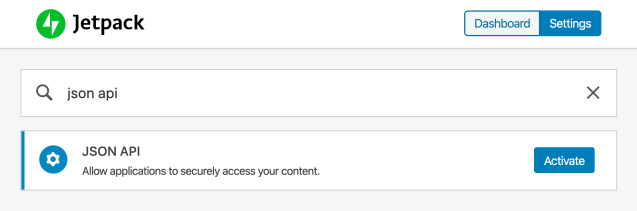
- That’s it!
Other plugins causing problems
Sometimes other plugins can, intentionally or otherwise, affect Jetpack. For example, an error in a plugin can be appended to the result from Jetpack, causing the Google Add-on to fail. If you suspect this may be causing a problem you should disable all other plugins and check if the problem goes away. If it does go away then you can incrementally re-enable plugins until the problem reappears, at which point you’ve located the cause.
Your server returned an unexpected response
When you save a draft the add-on will communicate with your server via Jetpack. If your server returns an error code (for example, a HTTP 404, or HTTP 500) then we are unable to continue. This error could be caused by many things, including a server misconfiguration, a bad plugin, etc. The best way to track this problem down further is to investigate your server’s error log (or ask your hosting provider to do this), and see if an error occurs around the time you tried to save a draft.
“Someone may be trying to trick you into giving them access to your site”
You may see this message when trying to authorize a Jetpack site, and it can be caused by one of several issues:
- Make sure you are running the latest version of the Jetpack plugin.
- Temporarily disable all plugins except for Jetpack and try again. If that works you can re-enable the plugins once you are connected.
- If you are using Cloudflare, try temporarily disabling it while you connect your site. Once your site is connected to the add-on, you can re-enable it.
- If your site uses HTTPS, your hosting company may be double-encoding some of the values being passed. To test this, go to http://your-site/?%40 (change your-site to the URL of your WordPress.org site). If your browser changes the URL to https://your-site/?%2540 (note that ?%40 changed to ?%2540) you need to contact your hosting company.
Frequently Asked Questions
Does it work on self-hosted WordPress.org?
Yes! You can use the add-on with both WordPress.com and self-hosted WordPress.org. To use with WordPress.org you will need to:
- Install Jetpack and connect your site
- Ensure the Jetpack Manage module is enabled
How do I uninstall the add-on?
Follow these steps:
- From Google Docs, click the “Add-ons” menu, then “Manage Add-ons”

- Click the “Manage” button next to WordPress.com for Google Docs

- Click the “Remove” button

Can I choose which Google account the add-on gets added to?
If you have multiple Google accounts, you can make sure that the add-on is added to the correct account by following these steps:
- Go to Google Docs.
- In the upper-right corner, make sure that you have the correct account selected.
- Open an existing document or create a new one.
- Install the Add-on
